How to Disable Text Selection in Blogger Blog


Creating Blog is not a big job, but creating content is a killer job and irritating job. The content of your website is more important for you. But, some times people will steal your valuable content and they will paste it to their website. So, you should be more careful about it. If you disable text selection in your blog, it's more difficult to steal. So, In this tutorial I gave you easy steps to Disable text selection in Blogger Blog.

Below are the steps to Disable text selection in your Blogger blog,

Step 1: Sign in your Blogger Blog.

Step 2: Select the Template section and click Edit Template.

Step 3: Paste the below code before </head>


<style>
.post-body {
    -webkit-touch-callout: none;
    -webkit-user-select: none;
    -khtml-user-select: none;
    -moz-user-select: none;
    -ms-user-select: none;
    user-select: none;
}
</style>

Step 4: Save your template and refresh your page.

Step 5: That's It. Now you wont be able to select your own content :).

All the best!
Read more

How to Add Twitter Updates On Blogger Blog


Twitter is one of the largest social media come after Facebook and Google plus. Webmasters knows that social media is very big marketing medium for websites and blog article. Social media will give massive amount of visitors to your website post if you use it correctly. Twitter is one easiest way to share your article with your friends and followers with free of cost. If you want to get your website more popular use twitter account and update your post in twitter regularly.

This blogger post will help you, how to show twitter updates on blogger blog. Your blog visitor can know what update is going on about your blog and they will follow your blog via twitter. Twitter is a very big social media network and surely that will get you more traffic to your website or blog.

The below steps will help you how add twitter update on you blogger blog.

Step 1: Open Twitter's widgets page.

Step 2: You will find Create New button on top right of the screen, Click it.

Step 3: Customize your widget with the height, width, color etc.

Step 4: Click Create Widget button and the code for your widget will appear.


Step 5: Copy the code.

Step 6: Open your Blogger Blog and select Layout section.

Step 7: Click Add a Gadget button and then select HTML/JavaScript widget.

Step 8: Paste your code in the comment box of HTML/JavaScript and save it.

All the best!
Read more

How to Add Linkedin Share Button to Blogger Blog


LinkedIn is a professional community social network, you can share your thought's with your LinkedIn connections like friends and professional's. Increase your professional community so that you share your post with them. If you have blog or website, LinkedIn will help you to get more visitors. You can share your website post with your LinkedIn communities as well as connections. Nowadays social media is always top, if you want to content marketing.

LinkedIn is varies compared with other social medias, because this is only for professionals and this wont allow live chatting and instant photo sharing. Professionally you can use LinkedIn profile to share about job opening, technical skills and articles with your LinkedIn friends, colleagues and professionals.

The below steps will help you how to add LinkedIn share button to blogger blog.

Step 1: Sign in to Blogger blog.

Step 2: Open Blogger blog and select Template and click Edit Template.

Step 3: Search for the below "jump-link" code.


 <b:if cond='data:post.hasJumpLink'>
<div class='jump-link'>
<a expr:href='data:post.url + "#more"' expr:title='data:post.title'><data:post.jumpText/></a>
</div>
</b:if>

Step 4: Paste the below code after the above code.

Button code for Vertical count

<b:if cond='data:blog.pageType == &quot;item&quot;'>
<script type='IN/Share' expr:data-url='data:post.url' data-counter='top'></script>
<script src='//platform.linkedin.com/in.js' type='text/javascript'>
 lang: en_US
</script>
</b:if>

Button code for Horizontal count

<b:if cond='data:blog.pageType == &quot;item&quot;'>
<script type='IN/Share' expr:data-url='data:post.url' data-counter='right'></script>
<script src='//platform.linkedin.com/in.js' type='text/javascript'>
 lang: en_US
</script>
</b:if>

Button code for No count

<b:if cond='data:blog.pageType == &quot;item&quot;'>
<script type='IN/Share' expr:data-url='data:post.url'></script>
<script src='//platform.linkedin.com/in.js' type='text/javascript'>
 lang: en_US
</script>
</b:if>

Step 5: Use any one from above. That's it!

All the best!
Read more

How to Add Facebook Comment Box on your Blogger Blog


Most of the blogger are using Facebook Comment Box to gain more fans for their blog. Using Facebook Comment Box, you can find how many people commented your Facebook posts. Facebook comment box is a special version designed only for Facebook pages. So, comment box allows bloggers to promote their pages.

Follow the below steps to add Comment Box to your website

How to Add Facebook Comment Box on your Blogger Blog


Step 1: Login to Blogger Blog.

Step 2: Select Template Section and click Edit Template.
Note: Before editing take backup.

Step 3: Copy the below Javascript SDK and paste it after opening <body> tag.


<div id="fb-root"></div>
<script>(function(d, s, id) {
  var js, fjs = d.getElementsByTagName(s)[0];
  if (d.getElementById(id)) return;
  js = d.createElement(s); js.id = id;
  js.src = "//connect.facebook.net/en_US/sdk.js#xfbml=1&version=v2.0";
  fjs.parentNode.insertBefore(js, fjs);
}(document, 'script', 'facebook-jssdk'));</script>

Step 4: Place the below peace of code to your website, where you want appear Facebook comment box.

<div class="fb-comments" data-href="http://developers.facebook.com/docs/plugins/comments/" data-width="300" data-numposts="2" data-colorscheme="light"></div>

Step 5: Paste your facebook URL instead of above URL(red). Thats it. Save your template and refresh your page.

Now you can see you Facebook comment box on your website.

All the best !!!
Read more

Add/Submit Sitemap to Google Webmaster Tools for Blogger Blog


Google Webmaster Tool is a free tool to monetize your blog content. If you are a new blogger you should now what is Google Webmaster Tools. In this tutorial I explained you how to submit XML sitemap to webmaster tolls for blogger blog. This XML sitemap is used by Search engines to find your content easily.

What is Sitemap?

Sitemap is a list of accessible web pages in your blog. Sitemaps simply helps to search engines to easily crawl web pages from your website.

How to submit Sitemap to Webmaster Tools for Blogger


Below are the steps to submit sitemap to webmaster tools,
Step 1: Log in to Google Webmaster Tools.
Step 2: Open the blog which you need to submit sitemap URL.
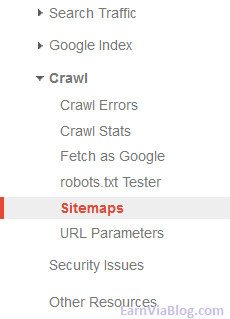
Step 3: Expand Crawl then Click Sitemaps.

select the sitemap from crawl

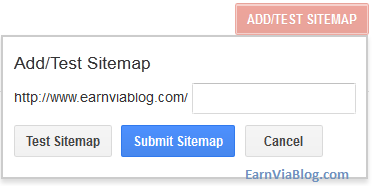
Step 4: Then Click Add/Test Sitemap Button.

add test submit sitemap

Step 5: Then add the below code in to the above text field.

atom.xml?redirect=false&start-index=1&max-results=500

Step 6: Click Submit Sitemap button. That's it.

The above code will help to add 500 posts. if you want to add sitemaps with more than 500 post, then use the below code's.


atom.xml?redirect=false&start-index=1&max-results=500
atom.xml?redirect=false&start-index=501&max-results=500
atom.xml?redirect=false&start-index=1001&max-results=500
atom.xml?redirect=false&start-index=1501&max-results=500
atom.xml?redirect=false&start-index=2001&max-results=500

You can use the above code if needed. I hope the above tutorial helped you.

All the best!
Read more

How to Add Facebook Popup Like Box on your Blogger Blog


Most of the blogger are using Facebook Like Box to gain more fans for their blog. Using Facebook Like Box, you can find how many people liked your Facebook page. Facebook like box is a special version of Like button designed only for Facebook pages. So, like box allows bloggers to promote their pages. In this blogger tutorial I gave you how to add facebook Popup Like Box on your Blogger blog.

Follow the below steps to add Popup Like Box to your website

How to Add Facebook Popup Like Box on your Blogger Blog


Step 1: Log in to Blogger Blog.

Step 2: Select Layout Section and click Add a Gadget. Then Select HTML/JavaScript widget.


Step 3: Copy the below code and paste it in content area of HTML/JavaScript widget.


<script src='http://ajax.googleapis.com/ajax/libs/jquery/1.7.2/jquery.min.js' type='text/javascript'></script>
<style>
#fanback {
display:none;
background:rgba(0,0,0,0.8);
width:100%;
height:100%;
position:fixed;
top:0;
left:0;
z-index:99999;
}
#fan-exit {
width:100%;
height:100%;
}
#JasperRoberts {
background:white;
width:420px;
height:270px;
position:absolute;
top:58%;
left:63%;
margin:-220px 0 0 -375px;
-webkit-box-shadow: inset 0 0 50px 0 #939393;
-moz-box-shadow: inset 0 0 50px 0 #939393;
box-shadow: inset 0 0 50px 0 #939393;
-webkit-border-radius: 5px;
-moz-border-radius: 5px;
border-radius: 5px;
margin: -220px 0 0 -375px;
}
#TheBlogWidgets {
float:right;
cursor:pointer;
background:url(https://blogger.googleusercontent.com/img/b/R29vZ2xl/AVvXsEjVues_XJ62zc3GWfnuNZh5Lyi6ye4l5LDeTgOZRn6b1-VWw8lWhAj6Tl-sqF_jD7SB5KtdmvrObHM0RVCjyQ3zDJ8ZLsWofJzweEbelk_ez_FYITCdZwoyvRlS2pT9wvw1AdTcwD8MVtkd/s1600/TheBlogWidgets.png) repeat;
height:15px;
padding:20px;
position:relative;
padding-right:40px;
margin-top:-20px;
margin-right:-22px;
}
.remove-borda {
height:1px;
width:366px;
margin:0 auto;
background:#F3F3F3;
margin-top:16px;
position:relative;
}
</style>
<script type='text/javascript'>
//<![CDATA[
jQuery.cookie = function (key, value, options) {
// key and at least value given, set cookie...
if (arguments.length > 1 && String(value) !== "[object Object]") {
options = jQuery.extend({}, options);
if (value === null || value === undefined) {
options.expires = -1;
}
if (typeof options.expires === 'number') {
var days = options.expires, t = options.expires = new Date();
t.setDate(t.getDate() + days);
}
value = String(value);
return (document.cookie = [
encodeURIComponent(key), '=',
options.raw ? value : encodeURIComponent(value),
options.expires ? '; expires=' + options.expires.toUTCString() : '', // use expires attribute, max-age is not supported by IE
options.path ? '; path=' + options.path : '',
options.domain ? '; domain=' + options.domain : '',
options.secure ? '; secure' : ''
].join(''));
}
// key and possibly options given, get cookie...
options = value || {};
var result, decode = options.raw ? function (s) { return s; } : decodeURIComponent;
return (result = new RegExp('(?:^|; )' + encodeURIComponent(key) + '=([^;]*)').exec(document.cookie)) ? decode(result[1]) : null;
};
//]]>
</script>
<script type='text/javascript'>
jQuery(document).ready(function($){
if($.cookie('popup_user_login') != 'yes'){
$('#fanback').delay(10000).fadeIn('medium');
$('#TheBlogWidgets, #fan-exit').click(function(){
$('#fanback').stop().fadeOut('medium');
});
}
$.cookie('popup_facebook_box', 'yes', { path: '/', expires: 7 });
});
</script>
<div id='fanback'>
<div id='fan-exit'>
</div>
<div id='JasperRoberts'>
<div id='TheBlogWidgets'>
</div>
<div class='remove-borda'>
</div>
<iframe allowtransparency='true' frameborder='0' scrolling='no' src='//www.facebook.com/plugins/likebox.php?
href=http://www.facebook.com/Earnviablog&width=402&height=255&colorscheme=light&show_faces=true&show_border=false&stream=false&header=false'
style='border: none; overflow: hidden; margin-top: -19px; width: 402px; height: 230px;'></iframe><center>
<span style="color:#a8a8a8;font-size:8px;" id="linkit">Powered by <a style="color:#a8a8a8;font-size:8px;" href="http://www.earnviablog.com">Earn Via Blog</a> - <a style="color:#a8a8a8;font-size:8px;" href="http://www.earnviablog.com">Blog</a></span></center>
</div>
</div>

Step 4: By default, the Like box only visible for first time user visits your website. If you want to make it visible every time you need remove below code from the above code.

$.cookie('popup_facebook_box', 'yes', { path: '/', expires: 7 });

Step 5: Thats it. Save your template and refresh your page.

Now you can see your Facebook Popup like box on your website.

All the best !!!
Read more

Title tag and Meta Description Length Limits for Popular Search Engines


Some blogger using many words in a title and descriptions. That is totally wrong. Because search engines allows you to use specific number of characters in title as well as descriptions. This is one of the most important article for the starter bloggers. In this post I have mentioned that maximum number of character limit of title tag and meta description tag of popular search engines like Google, Bing, Yahoo etc., For Every blogger knows that when you comes to search engine optimization, title and descriptions are more important.

Title tag and Meta descriptions are important Search engine optimization technique. So, if you avoid title tag and Meta description, search engine will avoid your website.

Below I mentioned length limits of title tag and meta description.

Title Tag and Meta Description Length Limits.


Google Search engine
-Maximum character limits for title tag == 69 Characters including spaces.
-Maximum character limits for Meta description tag == 156 Characters including spaces.

Bing Search engine
-Maximum character limits for title tag == 65 Characters including spaces.
-Maximum character limits for Meta description tag == 150 Characters including spaces.

Yahoo Search engine
-Maximum character limits for title tag == 72 Characters including spaces.
-Maximum character limits for Meta description tag == 161 Characters including spaces.

All the best!
Read more